Microsoft Windows Vista users must have used the search box on the Start menu and after using it they must have experienced its sheer power. This search box not only searches in your start menu and control panel but also your personal files like pictures, documents and even your emails. This makes it very useful for everyday tasks. It also saves time and we also tend to get the habit of getting what we want by just typing a few letters and the reason why I love it!
Getting back to the topic, if you are having a lot of personal files then this feature of the search box, i.e., searching through files takes toll on its performance and causes it to slow down. But if we narrow down the search to only start menu and control panel then we can easily get some performance benefits. This tip will help us to find the program or setting easily and faster. Follow these steps to make search box faster:
1. First right-click on the Start button and select Properties.
2. Then select the Customize button.
3. Remove the check where it says Search Communications.
4. Then for Search Files set Don’t search for files.
5. Click OK, then OK again and you are done.
Here’s a very good trick for Windows Vista Aero users! If you are using Windows Aero, you can use this Registry trick to slow down the animations (i.e. maximize/minimize) when you hold down the Shift key on your keyboard. You have to modify the Registry a little to achieve this!
The advantages of using this trick is that not only does this allow you to see the animations clearer but it also leaves the Flip 3D on the screen even after you let go of the [Ctrl] + [Windows Key] + [Tab] combination. Normally what happens is that Flip 3D exists the screen as soon as you leave this key combination. Whenever you minimize or maximize or close a window, if you hold the Shift key down you will be able see how impressive Vista is in slow motion. Follow these steps:
• Click on the Start button. Then open the Run dialog box (Windows Key + R combination will also open the Run dialog box).
• Type regedit.exe, click OK. If User Account Control (UAC) prompts you to allow the action, click Continue.
• Now, navigate to this key: HKEY_CURRENT_USER\Software\Microsoft\Windows\DWM.
• In the right side of the Registry editor window, right-click on an empty space and select New
• Now, from this context menu that appears, select DWORD (32-bit) Value.
• Name this new DWORD value as AnimationsShiftKey.
• Now, Double-click on this newly created DWORD and give it a value of 1.
• Click on OK and close the Registry Editor.
• To see the changes, Log off of Windows and then log in back again.
• Now, Just hold the Shift key and minimize or maximize a window. You will notice that the animation is slowed down and it looks very nice too!
• If you want to get back to normal and stop this effect, then simply do not press the Shift key on your keyboard while using Flip3D or Aero.
Read more......
ReadyBoost is a component of Microsoft’s Windows Vista operating system. It works by using flash memory, USB 2.0 drive, SD card, CompactFlash or any kind of portable flash mass storage system as a drive for disk cache. ReadyBoost is present, with fewer restrictions than in Vista, in the beta version of Windows 7. ReadyBoost is also used to facilitate SuperFetch, an updated version of Windows XP’s prefetcher which performs analysis of boot-time disk usage patterns and creates a cache which is used in subsequent system boots.
In order to take advantage of this feature and boost performance as stated above you will need a flash memory device. But if you really want to see the boost your device should meet some minimum performance and space requirements:
• The device must be at least 64 MB
• The device must be USB 2.0
• It has to be able to read at 3.5 MB/s
• It has to be able to write at 2.5 MB/s
But don’t worry if you do not know the device’s specs or is unsure about it, just give it a try. To get started using ReadyBoost, follow these steps:
• First, plug in USB storage device.
• If autorun is enabled, Vista or Windows 7 will ask you what you want to do with it. Just select the option that says “Speed up my system”
- If your device is fast enough you will see a properties dialog box for further configuration.
- Select “Use this device”
- Select the amount of space on it you want to dedicate for the ReadyBoost system file.
- Click OK and you are finished.
• If autorun is disabled, then go to Computer and right click on the removable storage device and select Properties.
- If your device is compatible, you will see a ReadyBoost tab. Select that tab by clicking on it.
- Then select “Use this device”
- Select the amount of space on it you want to dedicate for the ReadyBoost system file.
- Click OK and you are finished.
From now on your memory device will be used instead of hard disk as virtual memory. If you have any questions regarding ReadyBoost you can visit Tom Archer’s blog. Feel free to comment below your experience with ReadyBoost.
Read more......
Pin Folders To Start Menu In Windows XP, Vista Or 7
Posted by Freaks Labels: Vista Tips n Tricks, Windows 7 Tips n Tricks, XP Tips n TricksWindows XP, Vista or 7 allows us to pin our most frequently used application to the Start menu by right clicking on it and selecting Pin to Start Menu. This gives us instant access to these applications. If we want any other item to pinned list, we can do so by dragging and dropping it to the Start button or the Start menu. If we want to remove these pinned item we can do so by right-clicking it and clicking Unpin from Start Menu or Remove from This List. The order of the items in this list can be arranged by dragging and dropping them to the preferred location. To add a folder to the Start Menu Pin list, you may use the drag-drop method as stated above. But we cannot pin our frequently used or favourite folders to the Start menu by right clicking on it. Here is a cool trick to pin your folders to the Start menu by right clicking on the folder and selecting Pin to Start Menu:
• Click on the Start menu button and type regedit in the Start menu search box and press Enter. For XP users select Run from the Start Menu and type regedit in the Run dialog box and press enter.
• This will open the registry editor.
• Now browse to the key
HKEY_CLASSES_ROOT\Folder\shellex\ContextMenuHandlers
• Once you are there right click on the right pane and select New and then Key.
• Type in {a2a9545d-a0c2-42b4-9708-a0b2badd77c8} and press Enter.
• Once this is done, close the registry and restart your computer for the changes to take place.
Now, to pin a folder to the Start Menu, press and hold the Shift key and then right-click a folder. The Pin to Start Menu entry will appear in the context menu.
Voila! You can now pin your folders to the Start menu too!
Note: If you want to undo this trick just delete the key {a2a9545d-a0c2-42b4-9708-a0b2badd77c8} from the registry. This tip will not work if you are using the classic start menu.
Help at hand: If you don’t want to go through all the tedious work of editing the registry, download PinFolderToStartMenu.zip and run Pin.reg to automatically insert the values. To undo or delete the created key run the file UndoPin.reg.
Read more......
Deleting temporary internet files that are cluttering up your computer
Posted by Freaks Labels: Vista Tips n Tricks, XP Tips n TricksTemporary Internet Files
RunDll32.exe InetCpl.cpl,ClearMyTracksByProcess 8
Cookies
RunDll32.exe InetCpl.cpl,ClearMyTracksByProcess 2
History
RunDll32.exe InetCpl.cpl,ClearMyTracksByProcess 1
Form Data
RunDll32.exe InetCpl.cpl,ClearMyTracksByProcess 16
Passwords
RunDll32.exe InetCpl.cpl,ClearMyTracksByProcess 32
Delete All
RunDll32.exe InetCpl.cpl,ClearMyTracksByProcess 255
Delete All - "Also delete files and settings stored by add-ons"
RunDll32.exe InetCpl.cpl,ClearMyTracksByProcess 4351
These commands should work in Internet Explorer 7 on XP or on Windows Vista.
Read more......
If you like to increase/optimize your Hard Disk I/O - read/write speed without buying expensive software utilities to do that job or changing the HD, just follow next steps. With doing these steps you will increase Hard disk speed (depends of manufacture and specification, but its worth to try). The most speed improvement is visible with IDE drives; however there are reports that this tweak also does good for SCSI disks.
In any case, it won't harm your system, so try it yourself and let me know what you find!
Steps:
1. Run SYSEDIT.EXE from the start.
2. Expand the system.ini file window.
3. Scroll down almost to the end of the file until you find a line called [386enh].
4. Press Enter to make one blank line, and in that line type
5. Irq14=4096 (note: This line IS CASE SENSITIVE)
6. Click on the File menu, then choose Save.
7. Close SYSEDIT and reboot your computer.
8. Restart windows!
The speed improvement will be noticed just after the system reboots, any system info. software can be used to check the improvement.
Read more......
Increase the Browsing and Downloading speed in Windows Vista
Posted by Freaks Labels: Vista Tips n TricksFor doing this trick run as Administrator in Windows Vista.
With windows Vista you have noticed the slow internet speed. The web browsing and downloading speed is very slow as compare to previous versions of windows. You can open the same sites in windows XP and server 2003 with the normal speed.
Follow the given steps to increase the Vista browsing speed:
First, go to Advance tab in Internet Explorer settings and turn off the TLS (Transport Layer Security) encryption option. Here to fix problem with some secure pages turn on the SSL 2.0 (Secure Sockets Layer) feature and click Ok button to close it.
Follow the major fix for this problem:
In windows Vista, the TCP autotuning feature is enabled by default. Some web servers do not respond properly to this feature, so it appears that some sites open with very slow speed.
To use this feature, you will need to be logged into your computer with administrative rights.
First click on Start button and type CMD in Run option then press Enter.
At Command Prompt, type the following command and press enter.
netsh interface tcp set global autotuninglevel= disabled
This command will disable the TCP autotuning feature. Now close the command Prompt and restart your computer after any changes to go into effect.
You can easily restore these setting by typing the following command at Command Prompt.
netsh interface tcp set global autotuninglevel= normal
Now close the command Prompt and again restart your computer after any changes to go into effect.
Read more......
How to Deny Access to Files or Folders in Windows Vista
Posted by Freaks Labels: Vista Tips n TricksYou can restrict access to a particular folder which could be any where on your hard drive.
Set File or Folder Security
Right click on the folder which you want to block from other users and select Properties.

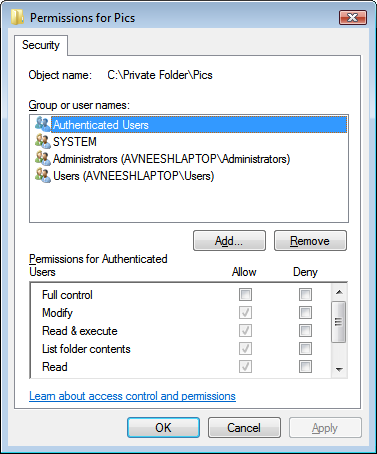
Now click the Security tab in the folder properties window, and then click the Edit button.
![folder-properties[3]](http://www.howtogeek.com/wp-content/uploads/2008/07/folderproperties3.png "folder-properties[3]")
Click on the Add button to open the "Select Users or Group" window.
Now you can enter the username of the account for which you want restrict access in the text box (Use the "Check Names" button to validate)

or
if you are not sure about the username then click the Advanced button, which opens the search window.
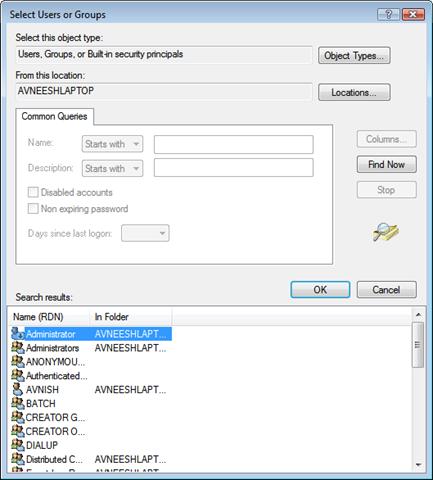
To search all users click the Find Now button and then locate the user which you want restrict access to the folder and click OK. Now, you will see the username listed in the Security Permissions window, click on the username to select.

Select the Deny Permissions for that user by checking the Deny box for Full Control.

Now, you will be shown a Windows Security message which in short says that Deny entries always override the allow permissions. Click Yes, and then click OK.
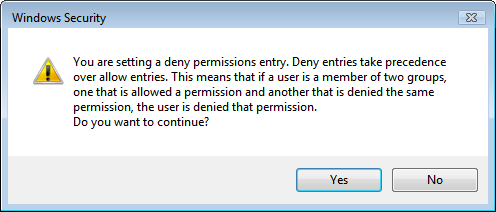
In this way you have restricted access to the folder for a particular user (
Read more......
Have you ever wondered how many times per day you check your email? For many of us, it's far too often… and if every single time you have to click on a little icon in the tray, or find the Outlook button in the taskbar, it can get a little annoying. Instead of that, what I do is assign a hotkey to switch to my already open Outlook window.
This is especially helpful for those of us that have at least 37 windows open at any given point… alt-tab is just inefficient at that point.
Creating the Shortcut for the Hotkey
In order to assign the hotkey, you'll need to first create a new shortcut in the start menu (or desktop), because the one in the Start menu doesn't have the right options and the one in the quick launch won't let you assign a hotkey.
To add one into the start menu, right-click on the Start button and then select "Open" from the menu:

Browse down into the Programs folder (or further if you'd like), and then create a new shortcut to Outlook here (the easiest way is to just right-click drag the one from the quick launch)

Now open up the properties, and make sure that the end of the Target line has the /recycle option (it should if you copied the one from the Quick Launch bar). This is the magic switch that will re-open your Outlook window, rather than opening a new instance of Outlook.

Go ahead and assign your hotkey here in the Shortcut key box. As soon as you click the OK button the hotkey should be active. Note: You could have created this shortcut on the Desktop if you had wanted to.
Make Outlook Hide When Minimized
You can easily make Outlook 2007 minimize to the system tray by right-clicking the tray icon and choosing "Hide When Minimized". I'm not sure if this option exists in prior versions or not.

Read more......
Open Control Panel and double click on Regional and Language Options.

Next, under the Formats tab click on the “Customize this format” button.

Now under the Time tab, enter in the character and / or symbols you think would get a great laugh in the AM / PM fields. You can basically enter in whatever you want up to 12 characters. Click OK twice to get out of Regional and Language Options.

Here are a few examples of what you can achieve. From your name to old chat emoticons.


If your co-worker is not aware of this trick … they will have a heck of a time trying to correct it. Each different example you create will show up now in the drop boxes.

This trick also works in XP. Control Panel \ Regional and Language Settings \ Customize \ Time tab.

Read more......
Installing CutePDF Writer
There are actually two pieces to the installation… you'll need to first install Ghostscript (provided on the download site itself), which is the engine that actually will convert the printer output into a PDF. Installing it is simple enough…

At the end you'll get a dialog asking if the program installed correctly. Make sure to click "This program installed correctly".

The next step should be to install CutePDF itself, but unfortunately it cannot be installed while UAC is enabled. What we'll have to do is disable UAC, reboot, install CutePDF, and then re-enable UAC and reboot once again.
Update
It looks like most people are able to install this application without any issues at all, so your best best is to run the installer, and hopefully it will work. If it doesn't, then you can follow the instructions for disabling UAC.
Open up Control Panel, find User Accounts, and then click the link for "Turn User Account Control (UAC) on or off"

Now uncheck the box, click OK, and then reboot your computer.

Now start the CutePDF installation, which should only take a couple of clicks.

Important: Go back in and re-enable UAC using the same mechanism as above, just make sure to check the box. At this point you should be all done.
Using CutePDF Writer
Creating a PDF is as simple as clicking the Print button in any application in Windows, and then choose CutePDF Writer as the printer.

If you click on Properties, you can turn off color, which should reduce the size of the files by a ton as long as you don't mind black & white.

There are even more settings behind the Advanced button, like quality options, compression, or even the option to embed fonts in the PDF or not.

You'll be prompted to choose a filename, and then you can view your printed page as a PDF document:

This really works well for printing receipts, or even for printing an article to PDF for later reading offline.
For extra credit, you can save any Office 2007 document as a PDF with a native plugin.
Update: Easier Install Method
Carlo noted in the comments that you could alternately use the also free doPDF software, which has a much simpler installation, but doesn't have support for converting to black & white, or any of the really advanced features in CutePDF.
Using it works exactly the same, just choose it from the print dialog. You can adjust the scaling and resolution options as well from the properties screen.

So you've got your choice of apps to pick from. I'm going to stick with CutePDF, but there's nothing wrong with doPDF either. Enjoy!
Download CutePDF Writer from cutepdf.com
Read more......
Organizing all of your tasks these days can be quite challenging. At work your employer probably supplies a calendaring and “to do” list application such as those included in Outlook. But what if you are a small business owner or home user and don’t feel like wasting money on expensive office applications? A very powerful, fun, and free desktop calendar application is Rainlendar2.
I am very impressed with the desktop calendar utility Rainlendar2. It does a lot of what you would expect from a calendar application and more. Out of the box it comes with a straightforward UI of course we can always Skin it as well.


Managing events and to do’s is as straight forward as it gets. This will be very familiar for those who use Outlook.

A handy feature is being able to review all your current events in one location. I find this great when planning future events mostly.

There are an amazing number of additional downloadable skins. This where the “fun” comes in. You’re likely to find a skin that will match any desktop configuration you might have. Here are just a couple of them.


You can choose which windows to display and drag and drop them in any order you like. For you Keyboard Ninja’s there is also the HotKeys feature!

Managing skins is very easy. Just right click anywhere on Rainlendar and go to Options. Then choose the Skins tab.

While I did have a lot of fun playing with various skins and different configurations with the UI, when you get down to the real function of the application … it can’t be beat. I am now using Rainlendar2 as my default program to manage events and to do’s. Also, when installing don’t forget to check the portable version as well. While this version is free you can go Pro which allows synchronization with Gmail and Outlook.

Read more......
Disable the Annoying "This page has an unspecified potential security risk" When Using Files on a Network Share
Posted by Freaks Labels: Vista Tips n TricksHave you ever right-clicked on a file from a mapped share and gotten this really irritating popup message from Windows? Even more annoying, when you try and drag and drop files from a network share, you get another popup asking "Do you want to move or copy files from this zone?" So what's the deal?
The Problem
Whenever you try and right-click on a file, like a zip file, you'll get an irritating popup: "This page has an unspecified potential security risk. Would you like to continue?" It's even more annoying cause, well, I'm NOT using Internet Explorer!

The problem gets worse… if you try and drag/copy files out of the folder you'll get the error "Do you want to move or copy files from this zone?"

Very annoying indeed!
The Reason
You are getting this error because Windows is not detecting your local network properly, and assuming that there is a security risk. This all goes back to the concept of "Security Zones" that you might have seen if you've ever looked in Internet Explorer's options panel.
In order to prevent rogue websites or applications from passing a UNC path as a link to run an application, Windows will detect that a UNC path (like \\computername\sharename) is not part of your local network, and prompt you before doing anything that could be unsafe. This security mechanism is definitely annoying, but it really is a necessary evil.
What we'll do is manually add the mapped drive computer name to the exception list.
Fixing the Problem
You'll need to open up Internet Options from Internet Explorer's Tools \ Options menu, or from the Control Panel. Once there, select the Security tab, click on the "Local intranet" icon, and then click on the "Sites" button.

If you only map drives to a few machines, what you can do is click on the "Advanced" button, and then add each machine name with this format:
file://computername
For instance, the name of my file server is superfast, so I put in file://superfast and then clicked the Add button. (Make sure to click the Add button!)

If you have a number of machines on your network, you could alternatively uncheck the "Automatically detect intranet network", and then check the other three boxes. This prevents you from having to enter each machine name manually, but allowing all network paths is probably not the most secure method, better to manually enter the machine name as detailed above.

Note: I was completely unable to use this method to remove the security popups when using an IP address to map drives. You'll need to switch to using the computer name when mapping drives in order to remove the messages. Technically we could remove the security popups across the board using the Custom Level button, but that would leave your computer with a security hole, so I'm not going to explain it.
Now that we've added the exception, you can right-click on the file without any issues:

You can also copy files and generally interact with the network share without problems.
Read more......
Assign Keyboard Media Keys to Work in Winamp
Posted by Freaks Labels: Vista Tips n Tricks, XP Tips n TricksHave you ever wondered how to make the media keys on your keyboard actually work for Winamp? Reader Shawn was asking me this question a while back, but then he figured it out on his own and sent me the instructions.
Turns out it's incredibly simple, and on most installations will be already set by default, but might not be enabled. If yours are not working, then you need to follow these instructions.
Open up the Winamp Preferences and the browse down to General Preferences \ Global Hotkeys.

The first thing you should check is whether the "Enabled" hotkey is checked. If it's not, then select that and most likely that will fix your issue.
If you need to manually change the settings instead, select the Action in the list, and then click inside the Hotkey textbox. Press the media key on your keyboard representing the function you are trying to do. For instance, I selected the Playback: Play/pause action in the list, so I pressed the Play button on my keyboard, which shows up as Play/Pause in the hotkey box.
Make sure you click the Set button when you make the change.
Read more......
Create Screensaver Icon
Right-click on the desktop and choose New \ Shortcut from the menu.

In order to launch the screensaver, you'll need to enter the full path to the screensaver file, followed by "/s"
%systemroot%\system32\Bubbles.scr /s

You would want to substitute the name of the screensaver where you see "Bubbles.scr" above. Also note that I used %systemroot% instead of C:\windows because not every install uses the C: drive.
If you don't know the filename, you can browse down to your system32 folder and then search for ".scr" using the search box:

You should see all of the names of all the screensavers installed on your system, which you can use in the location field.
Read more......
Completely Disable the System Tray on Windows Vista / XP
Posted by Freaks Labels: Vista Tips n Tricks, XP Tips n TricksOpen up regedit.exe through the start menu search or run box, and then navigate down to the following key (Create if it doesn't exist):
HKEY_CURRENT_USER\Software\Microsoft\Windows\CurrentVersion\Policies\Explorer

Create a new 32-bit DWORD value in the right hand pane with these values:
- Name: NoTrayItemsDisplay
- Value: 1
You will have to logoff and back on for this to take effect. To remove the hack, just delete the key, or change the value to 0.
Note that disabling the system tray doesn't actually prevent system tray apps from running, it just hides them. You should still disable any applications that aren't needed.
Update: Note that the same registry key may exist in more than one location, so if you are trying to reverse this hack, you should search the registry for NoTrayItemsDisplay.

